Monday, April 30, 2007
Sunday, April 29, 2007
ToolBars - Options
In Internet Explorer 7, you have a nice way to manage any addon toolbars you want. This is done from left clicking on Tools and going down to Toolbars.
Looking at the illustration to the right, you can display Favorites, History, Feeds, and other toolbars that come with Internet Explorer 7.
In the center section, shows that this person can display or hide five add on toolbars.
The bottom section is where you can customize or lock tools in place, according to the way you want it to be.
Saturday, April 28, 2007
Address Bar
Below the Title Bar in Internet Explorer web browser is a Address Bar. Some of the components will change depending on what version of Internet Explorer you have. I am using IE7 for this posting.
Look at the top of your web browser, just below the Title bar. Bar. From left to right I have listed some of the components.
- Directional Arrows - This allows you go back or forward in browsing different web pages.
- Address Window - This is where you type in your website name. On the right is a down arrow. This help you select websites that you have visited.
- Padlock - If you are on a secure website, a padlock with appear, in this location. However, if you do not have a secure internet connection the padlock will not be there.
- Refresh Button - Looks like two little arrows pointing to the tail of the other. Left clicking on this button will prompt the web browser to go out to the website and get the lastest information from the website you have listed in your address bar.
- Stop Button - If a web page starts to appear in your web browser that you don't want to see. Just left click on the "X" or stop button. This will stop the webpage from appearing in your browser.
- Search Engine Window - This is nice feature. You have a search engine window built into Internet Explorer 7. All you have to do is type in what you want to search.
- Magnifying Glass - Left clicking on this button activates the search process.
- Drop Down Chevron - A little black chevron is the last button in the row with the address bar. Left clicking on the chevron will allow you select which search engine you want to use.
Friday, April 27, 2007
Titlebar -Left
At the very top of Internet Explorer is what is called the Title Bar. The left side of the Title Bar is the logo for Microsoft Internet Explorer.
- Then you see the title of the website and/or webpage you are currently viewing.
- The text you see in the Title Bar is placed in the code of the webpage by the web designer.
- After the dash is (in this case)the program being used Windows Internet Explorer.
Thursday, April 26, 2007
Title Bar - Right
On the right of Internet Explorer and all other Windows programs is three little symbols. Each in it's own little box.
- The left box has a line in the box. This line will minimizes Internet Explorer to the Taskbar.
- The middle box has a single box or two little boxes. Left on the single box will enlarge Internet Explorer to full screen size. If there is two boxes, Internet Explorer is maximum size. Left clicking will reduce the size.
- The far right box is an "X". Left clicking on this box will close Internet Explorer.
Wednesday, April 25, 2007
Internet Explorer - Back
Moving to past webpages that have been visited is done with the back button in the top left of the web browser.
Few people know that by left clicking on the black chevron you can go back two or more web pages visited.
All you have to do in selecting a past webpage is move your cursor over the listing and left click.
Few people know that by left clicking on the black chevron you can go back two or more web pages visited.
All you have to do in selecting a past webpage is move your cursor over the listing and left click.
Tuesday, April 24, 2007
Taskbar Shows Windows that are Open
I find it quite interesting. Many new people, who are new to using computer, are shocked to find out they can have two or more window programs open and running at the same time. Of course this depends upon the powerfulness of the users computer.
You can bring these programs to the front moving your cursor over the taskbar and left clicking on the program or web browser page you want.
At this writing I have 5 main programs running, and 10+ webpages. I may have ADD. I like having so many projects, or like to projects. As my day progresses, the number of programs and webpages decreases. By the end of my day I have eliminated all but 2 programs and one webpage.
Monday, April 23, 2007
TaskBar - Start Menu
Sunday, April 22, 2007
TaskBar - Propteries
Saturday, April 21, 2007
Taskbar - More Options
Friday, April 20, 2007
Taskbar - The Starting Point
Along the bottom of the computer monitor is a blue strip, with different icons. This blue strip is called a Taskbar.
- Start button is at the far left of the Taskbar . The Start button the launch of many programs and tasks.
- Quick Launch Menu is to the right of the Start button . This is a list you can setup of commonly used programs. Just by left clicking on these icons will launch those favorite programs.
- Active Programs is the next section, moving from left to right. This is where a list of open programs will be displayed. Just by left clicking on these listing of these programs will bring them to the front of you monitor screen.
- System Tray is the list at the far right at the bottom of the computer monitor. This is a listing of programs running. If they may not listed in the Active Programs, some of these programs are running to give you wants a quicker response.
Thursday, April 19, 2007
Network and Internet Terms
In continuing with a list of terms the average computer user should have some knowledge of their meaning. Knowing these words will give you some understanding on how the internet works.
Today, we are going to look at five terms that deal with networking and the internet.
- Browser is the software that allow you to view web pages from your computer.
- Upload refers to putting files and/or data on the network server.
- Download refer to taking files and/or data from a server to a computer.
- Web Base Email is email that you can access from a web browser, with any computer that has an internet connection.
- POP Email has to be download from an email server you a computer's hard drive. The email only can be read from a program type called an email client.
Wednesday, April 18, 2007
Network Terms 2
Below is four more terms around the subject of networking.
- Server is a powerful computer that provides content to people on a network.
- Web Server is a server that provides just web content over the internet or other network.
- Email Server is a server routes email over a network.
- File Server provides a place to store files and data for access over a network.
Tuesday, April 17, 2007
Network Terms
If you have internet access, there are a few terms that would be good for you to know. Below I have listed four words you should know.
- Network is the connecting of two or more computers.
- Intranet is a network within a home or office.
- Extranet is a network computer that are across town or country.
- Internet is a open network to any computer on the planet eart.
Monday, April 16, 2007
Document and File Formats
It is hard to continue without defining some terms and words used around computers. Today, we will start with the six most common file types.
There are different programs that read and write text or graphic documents. The file type is determined by a dot and three or four letters after the file name. Below is a list of the seven most common ones.
- doc -text and graphics together in a document
- txt - plain text document without much text graphics
- gif - small graphics format can include animation
- jpeg - the most common graphic and/or picture format
- bmp - detail picture and graphic format
- xls - spreadsheet used by Microsoft Excel
- exe - executable program, not a printable file format
Saturday, April 14, 2007
Setting Default Printer
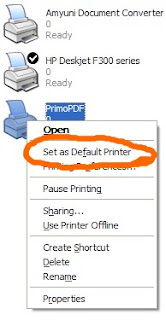
If you have several printers connected to your computer, you can choose your primary or default printer. This is done by opening the Printers and Faxes dialog box. Right click on the icon of the printer you want to be your default and left click on the line Set as Default Printer.
Bonus Tip: Windows does not always sees just physical printers. There are programs that convert a document to editable and non-editable formates. PrimoPDF is a program that converts pictures or documents to a PDF format.
Friday, April 13, 2007
Printer Propteries
From the Properties dialog box, left click on a printer icon. Then right click and select Properties. This will reveal a dialog box to reveal detailed printer setting, tests and adjustments.
At the bottom is a button to Print Test Page. This a good tool check if your printer is working. There is also Troubleshooting menu, if the printer does not perform it's test correctly.
Thursday, April 12, 2007
Printing and Faxes
From the Start menu, left click. Then left click on Printers and Faxes. This is where you add or remove physical a fax or a printer machines. Below you see more than just physical printers. The only physical printer in the screenshot below, if the HP Deskjet. All the others are special programs that convert documents to be shared other programs.
Wednesday, April 11, 2007
Monitor and Printer Color Don't Match!
Ever wonder why is it what you see on your computer monitor and what your printer prints on paper has different shades of a colors.
First, the colors you see on a monitor is illuminated. This means that a light source is suppling the image and the color.
Second, a printer prints colors that are reflective. This means that light reflects off the paper and to your eye. This can create quite a problem when you are editing a picture and want the colors to be as close as possible when you have your printer print it.
The best solutions is to print a picture with colors you use the most. Hold it up to your monitor, then adjust your monitor to match the colors, you just printed. If you have a more critical eye for color there is programs and devices, found on the internet, that will help you match the color more closely.
Tuesday, April 10, 2007
Backup or not to backup
Backing up the information on your computer is so important. The number one phones calls I get is from computer users who need information from their computer, the computer stops working.
There is no excuse for backing up information from a computer. There a number of good backup programs are available. Microsoft Windows, Windows 98 have a built in backup utility.
The Backup Restore Wizard can be accessed from the Start Menu > All Programs > Accessories > System Tools.
There is no excuse for backing up information from a computer. There a number of good backup programs are available. Microsoft Windows, Windows 98 have a built in backup utility.
The Backup Restore Wizard can be accessed from the Start Menu > All Programs > Accessories > System Tools.
Monday, April 9, 2007
Remote in System Properties
Remote tab can be the scariest tab in the System Properties dialog box. How many or you would like giving control of your computer to someone over the internet.
Regardless of the negative threats behind getting help with your computer from someone hundreds of miles away. Getting remote assistants can bring the best possible expertise to your home.
As much as I dislike remote control of my computer, I have used it. Under the right circumstances, it is a great help.
Sunday, April 8, 2007
Hardware in System Properties
The Hardware tab is all things hardware.
At the top is the Device Manger. The Device Manager is where you can tell if your computer acknowledges all connected hardware.
The middle section is labled Drivers, A Driver is the software that helps the hardware and a programs talk with each other. A good example of a driver at work is when a word processing program prints a document.
The bottom section is Hardware Profiles. It is here an advance user can setup different hardware profile for doing different special tasks with a computer's hardware.
Saturday, April 7, 2007
Advance System Propteries
The Advance tab has three areas for settings of your computer.
Performance is where you can set what has priority for your processor. You can tell your computer whether you want your computer's processor to focus on visual or background processes.
User Profiles is basically where my you set if you want your profile to be accessed across the network or just at that particular computer. Note: you need administrative privileges to use this profile.
Startup and Recovery should really be left to the default or factory setting. Otherwise you could cause more harm than good.
Friday, April 6, 2007
Automatic Updates
You can get, also, to Automatic Updates from the Security Center in the Control Panel. Microsoft likes to give several ways to get to setting or features. This is the second most popular way to set up Automatic Updates.
Along with a good anti-virus, and anti-spyware program, the monthly updates from Microsoft, of your operating system will plug holes that a malicious attacker can use to enter your computer.
Thursday, April 5, 2007
System Restore
System Restore is is found one of the tabs of the System Properties dialog box. System Restore needs to be turned on.
If you ever install a program or some hardware that causes your computer not work. System Restore allows you to roll back your computer settings back to a state where it worked.
All you have to do is make sure that the check box is unchecked, where it says "Turn off System Restore on all drives".
If you ever install a program or some hardware that causes your computer not work. System Restore allows you to roll back your computer settings back to a state where it worked.
All you have to do is make sure that the check box is unchecked, where it says "Turn off System Restore on all drives".
Wednesday, April 4, 2007
System Properties
Right clicking on My Computer, and going down to Properties opens a dialog box. In Windows XP there is seven tabs.
General Tab - General computer information
Computer Name - Network and system name for the computer
Hardware - Hardware profile
Advance - Performance, User Profiles, and Start up and Recovery
System Restore - Roll back to last know good setting
Automatic Updates - Set when and how you want your computer accept updates
Remote - Setting for remote user access to your computer
Tuesday, April 3, 2007
Add Remove Programs
Another tool that can be found in the Control Panel is Add/Remove Programs . The most common use for this tool is to remove programs (i.e. software) from your computer that has been installed.
This tool usually is not used for adding programs because most programs, now days come with their own installer.
Monday, April 2, 2007
Security Center
When Microsoft updated Windows XP with Service Pack 2, greatly improved the level of security in Windows XP by adding the Security Center.
To access the Security Center you start by left clicking on the Start button, and go to the Control Center. After the Control Center dialog box is open, left click on the Security Logo.
It is through the Security Center y0u are reminded that the 3 most important tools security tools are working on your computer. These 3 area are Firewall, Automatic Updates, and Virus protection.
Sunday, April 1, 2007
Defrag - Organize Your Hard Drive
After removing unused and temporary files through Disk Cleanup, now is the time reorganize the remaining files. This is done through Defragment the hard drive.
Once Disk Cleanup has finished, left click on the More Options or Tools at the top of the drive proprieties dialog box. About half way down the dialog box is Defragment Now.
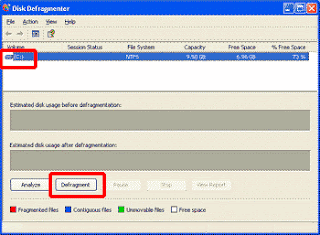
The dialog box you see below will appear. Left click in the upper box the drive you want to defrag. The left click on the button that reads, Defragment. This will start an analyze and defrag the drive.
This process will take from 30 minutes to several hours. The determining factors will be the size of the hard drive, the speed of the processor, and the degree the files are fragmented.
Subscribe to:
Posts (Atom)